A Month of Spookdays

IMG_6458

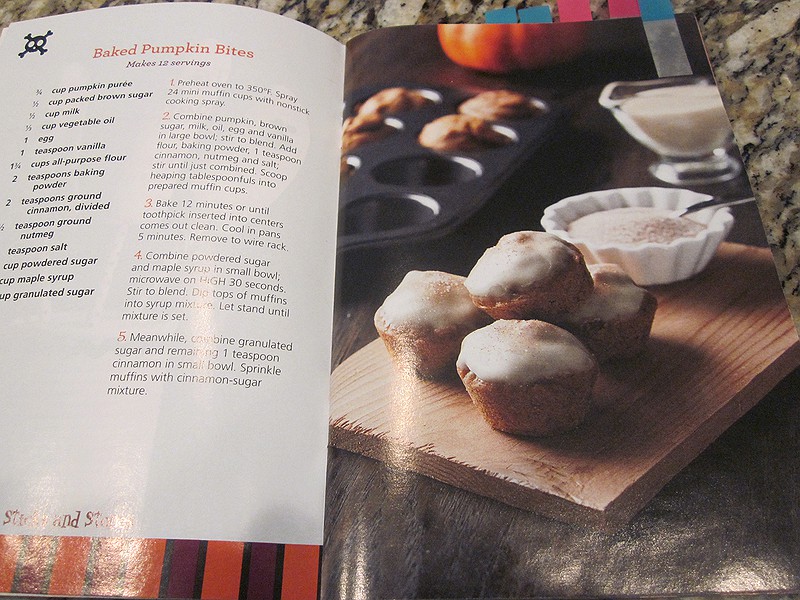
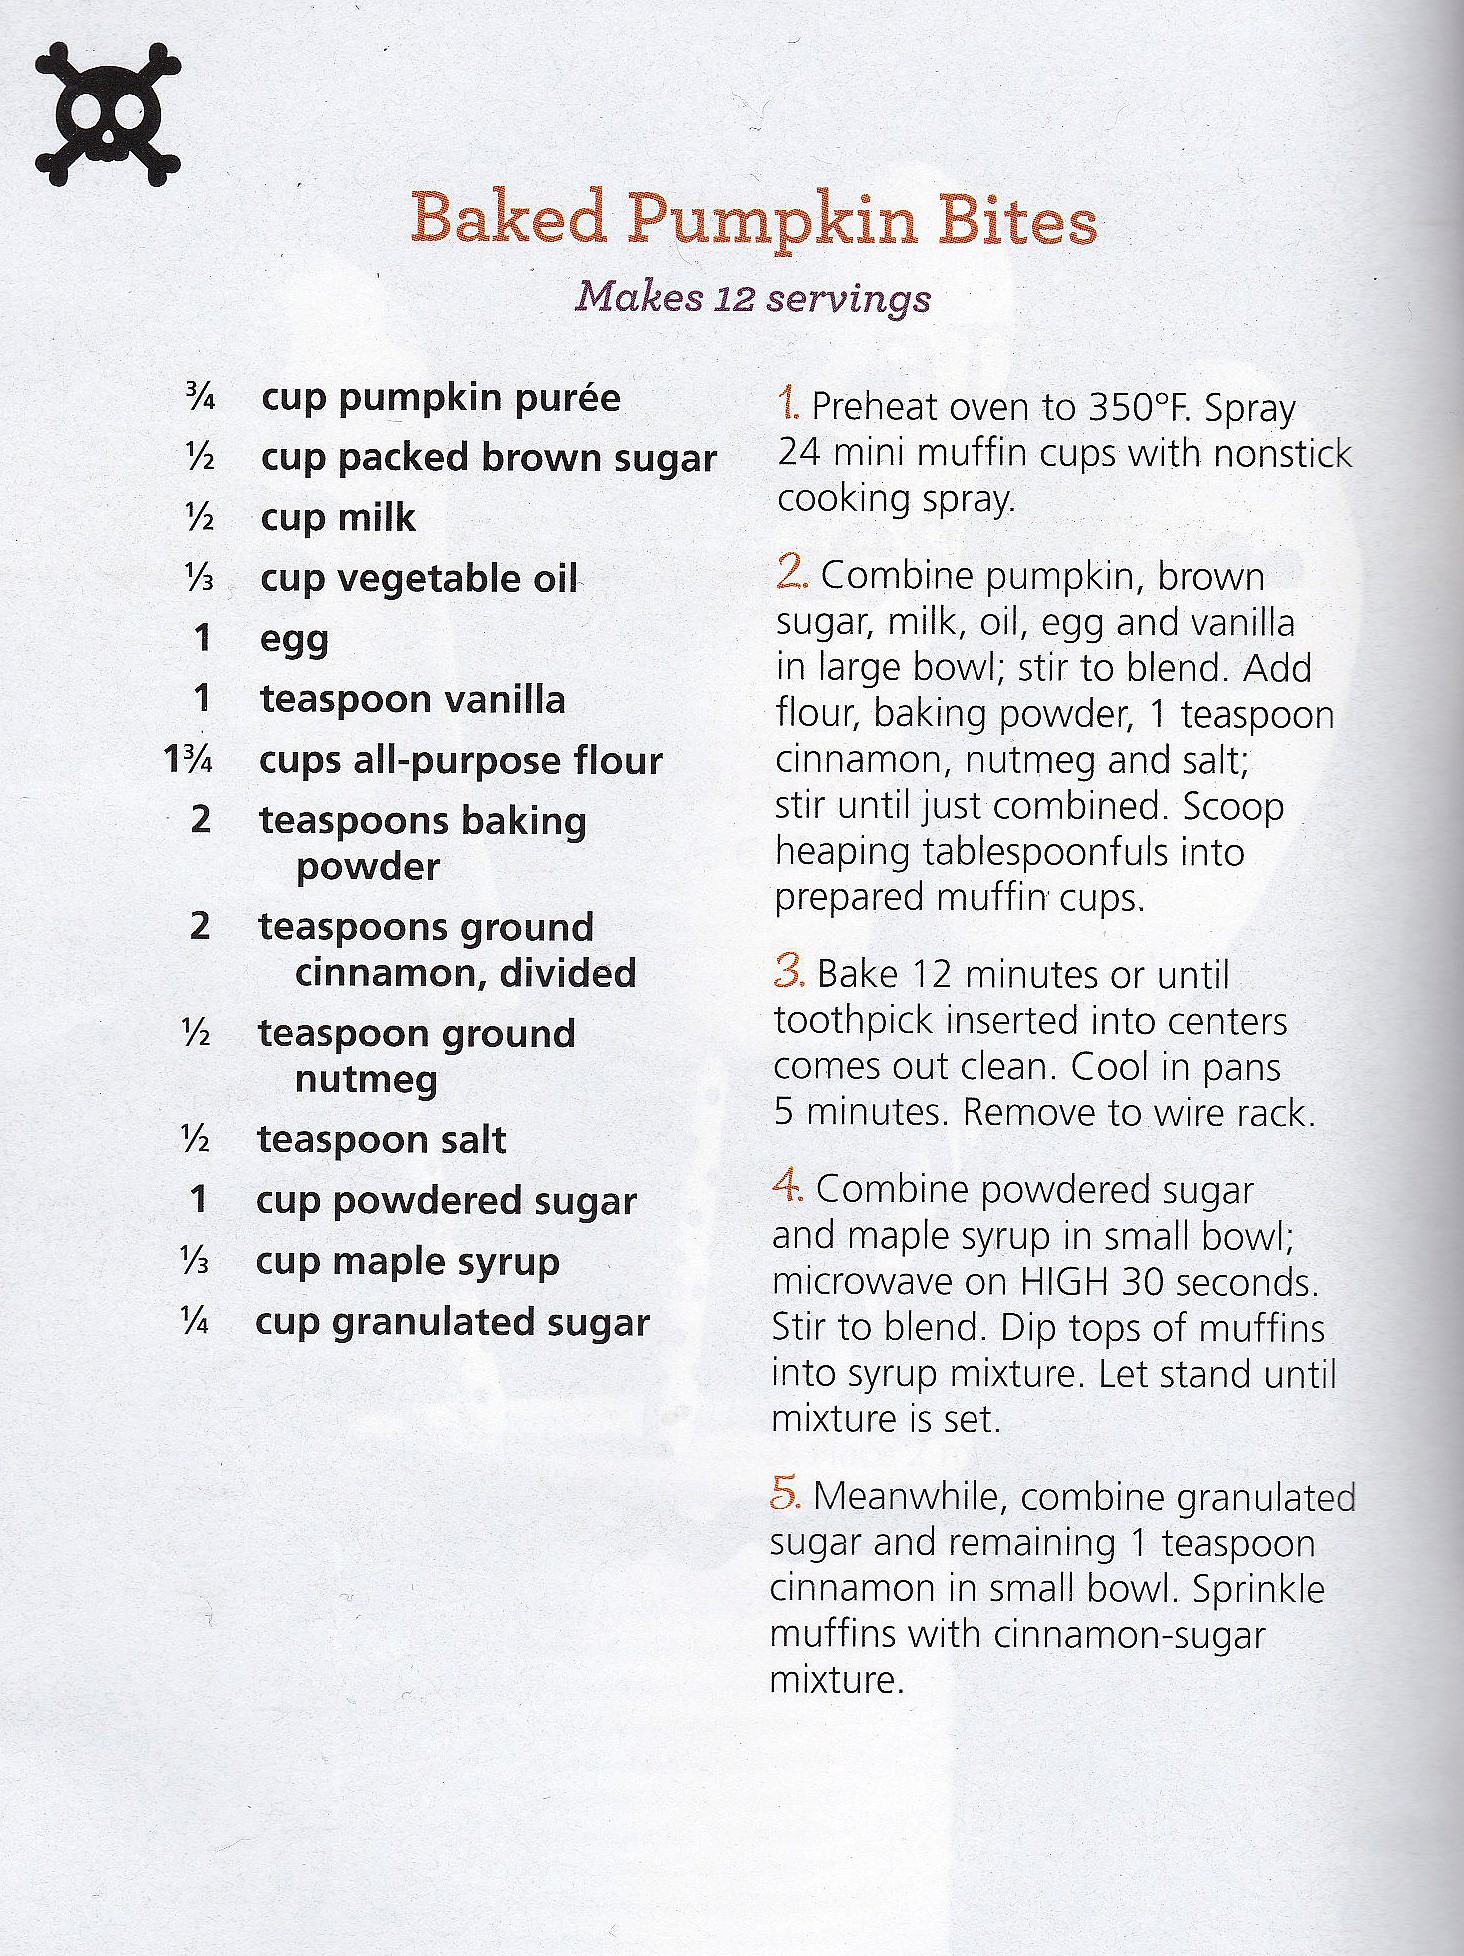
I picked up a mess of Tim Holtz Facets at Tuesday Morning for cheap, and I’ve been wanting to play with them. For this pendant I used:

  • Tim Holtz Facet, small round
  • Red handmade paper from Daigo Japan
  • Fab Lab Autumn Craft decoupage paper
  • Studio G bat punch
  • A Wink of Stella brush
  • Golden Fluid Matte Medium
  • Sakura 3D Crystal Lacquer
  • QuickStik
  • Distress Ink, Black Soot
bp 01

I always forget something in supply pics. This time: Distress Ink.

bp 02

To make my bats a little sparkly, I applied a couple coats with my A Wink of Stella brush. I love this thing.

bp 03

While that was drying, I ran a pencil around the Facet on my background paper.

bp 04

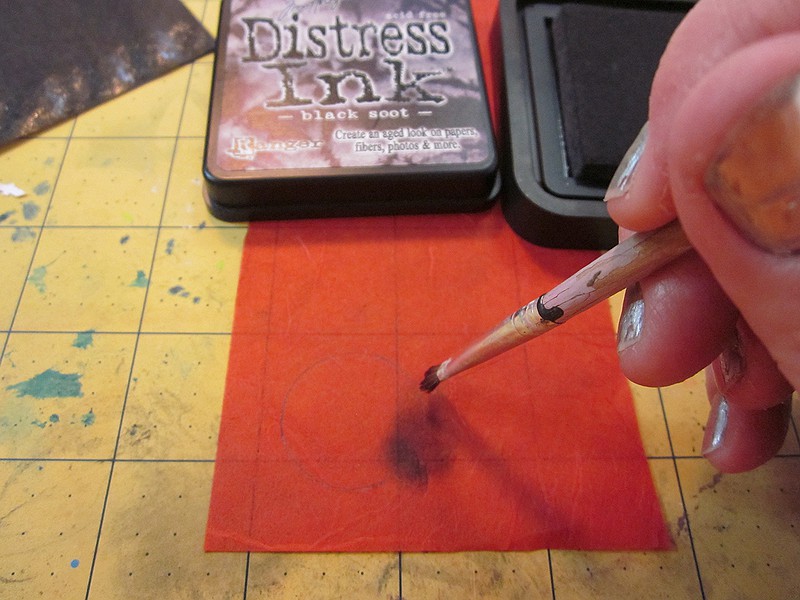
Using Distress Ink and a dry brush, I created a fairly deep vignette, so it would still be visible despite the strong facets on the pendant.

bp 05

Tissue paper doesn’t play nice with punches. You can make it behave by punching it along with a piece of plain paper. Then you verrrry carefully separate the paper from the tiny tissue shape. I punched out three bats, and made sure they were sparkle side down.

bp 06

I coated the entire back of the Facet with liquid matte medium.

bp 07

QuickStik is extremely handy for picking up tiny things. I placed the bats sparkle-side-down on the back of the Facet. I had to hold the bat down with the tip of my pencil and carefully lift the QuickStik, as the hold was a bit strong for itty bits of tissue.  Once the bats were arranged, I gently went over them with matte medium. Be careful not to move the bats around. Like I did.

bp 08

Making sure there was plenty of matte medium on the back, especially on the edges, I turned the pendant over and pressed it to the background tissue within the penciled guidelines.

bp 09

Working quickly, I applied matte medium to the back of the pendant, over the tissue, making sure everything was covered. With a damp fingertip, I carefully pressed the tissue, rolling my finger toward the edge, to eliminate any bubbles.

bp 10

I love how the back turns translucent. Now, wait for the pendant to dry completely. COMPLETELY. If you trim early, you’ll rip the tissue. Like I did.

bp 11

Okay, now you can trim. It’s easiest to do this right-side-up. Trim right up to the pendant edge.

bp 12

I applied a coat of 3D Lacquer to the back. I like this stuff because it’s very tough, and dries clear. I could have done a dome effect, but I like the thin coat better. It looks all artsy.

Add a jump ring (included with the Facets) and a cord, and you have a pretty sparkly bat pendant!

bp 13


sb 01

I have a rule about insomnia: after an hour of worrying about clowns eating me, I get up and do something. Last night, the clowns wanted to play with shrink plastic.

sb 02

Usually, I’ll use #6 plastic containers for my shrink film. This time, I wanted a white background, so I headed for my small stash of commercial sheets.  Everything except for the cat is stamped in StazOn Jet Black.

I used four stamp sets:

  • Mindscapes Halloween by Inkadinkado (pictured above)
  • Halloween Hauntings by Tattered Angels
  • Trick or Treat by Studio G
  • Beware by Studio G

sb 03

When I first stamped the cat (Tattered Angels), I had the hole by the tail, and it was so long it curled completely over and fused to the body. Oops. I went to re-stamp, and discovered I was out of white shrink plastic. I decided having a black cat would be cute, so I got out the White Opaque StazOn. I was right, it’s way cute.

sb 04

Once everything was shrunk, the blank backs looked sad, so I grabbed a damask stamp from Great Impressions.

sb 05

Now they’re as pretty on the back as the front. That’s an idea I’ll be going back to.

sb 06

Time for beads! Maybe. I was originally going to go lazy, and use stretch cord, but it wouldn’t work with the beads I wanted, so I rethought…

sb 07

…and ended up building a charm bracelet from jump rings. It won’t be the strongest, so I’ll have to wear it carefully.  At this point it’s about 2:00am, and I probably shouldn’t be trying to put together patterns from recalcitrant bits of metal.

sb 08

This looked good, but ended up being four inches long. Sigh. I took it apart and re-designed, and got a decent start before I fell over at 3:00am.

sb 09

Yay! All done. I managed to get the “Trick or Treat” charm on backwards, but hey, it wouldn’t be me if something wasn’t cockeyed.  I absolutely love this thing. I’m keeping it forever and ever. Or until I catch it on something and the jump rings separate.

sb 10

pb 01

I love to buy those holiday mini-magazines at the checkout. See those tabs at the top? That’s all the stuff I want to try out of this particular one.

pb 02

First up: Baked Pumpkin Bites! We’ll see how close I get.

pb 03

Getting started. Trick of mine: always put the eggs in first, so you can dig out shell if you need to. If I can’t do that, I crack them in a separate bowl first. And there’s my new mixer. I bought it because it has pastry hooks so I can make paper clay. Hope to use it for that some time this month.

pb 05

Here’s the actual recipe. Is it wrong to scan it in here? Probably. I rationalize that the little magazine is no longer available. Click to embiggen. I did everything to the directions except, well, I seem to have misplaced my brand new mini muffin tin. ARGH! I had cute little liners for it and everything! Oh well, it will turn up. So, cupcakes it is.

pb 04

These got baked for 21 minutes, rather than 12. Obviously, I could have put more batter in the cups.  Because they didn’t puff up over the liner (maybe I should have followed the recipe and skipped them?), I had to drizzle on the icing. The icing is very sweet, but it balances the cake, which is not so sweet, nicely. I was going to send these to work with the Spousal Unit. We’ll see how many survive.

pb 07

cembook 01

After making the log book for the Screaming Grimoire, I wanted to try another book with French binding. Got the sophomore blues a bit, but I still had fun.

cem book 03

I started by cutting some 9×12″ drawing paper in half, as I only wanted a little book. Creased, folded, and nested, I ended up with four signatures of four sheets each, making a total of 64 pages. Now they get pressed under a brick for a day.

cem book 04

Then I had to do math. Luckily, it was easy. I wanted to start my stitch holes ½” from the ends, then I needed four more holes to make six. The final four ended up an inch apart. Yes, I had to use a calculator. Shut. Up.  So why the Scrabble board? I’d bought a few at thrift stores and garage sales to get the tiles. The extra game boards came in handy for building a punching cradle, and boy am I glad I did–though mine is simpler than the one linked. It makes the hole punching so much easier. Here you see the template I made, sitting over the signature that’s getting punched.

cem book 05

My cover paper is another thrift store find. Very pretty handmade paper new in the roll for $1.50. I win. It was a bit thin for this application, so I saturated both sides with matte varnish and let it dry. Didn’t make it a lot stronger, but good enough to fold.

cem book 06

Though as it turns out, not strong enough to punch. I ended up putting a strip of book tape on the bit to be punched. It will barely show when the book is finished.

cem book 06.1

Stitching the first signature to the back cover with some pretty blue hemp. It’s waxed, but I run it through Thread Magic anyway, because tangles suck. That big paper thing in the background is a paper-covered brick, to keep the pages in place while you stitch.

cem book 07

All stitched. A little sloppy, as you can see when you look up instructions for French binding. I didn’t realize it at the time, but one of my kettle stitches was loose, so the book was also kinda loose. Sad face.

cem book 11

Next, I put down some wax paper and glued the spine. Then I move the book back on the paper so no extra glue is touching, fold the paper over, and the brick goes on top to press everything for several hours.

cem book 08

So how this fold goes: you lay it down like it’s another page–that’s your endpaper. Leave a little skosh room that you’ll trim later, and crease and fold at the spine. Stitching happens after that. Once stitched, you fold the cover forward then back again, and trim the endpapers. The actual cover is those two pieces of folded paper….

cem book 12

….and that bit left on the end gets glued down to cover the spine.

Next, decorate the cover! I’ve been on a tissue kick, so I ran some different tissues through a die cutter, and made a little cemetery scene. Pieces were attached with matte medium, and the whole front cover got a coat afterward.

This was as much fun as making the first book. Of course I want to try it again, and actually get the stitching tight!

cem book 02


sg 01

WELCOME TO HALLOWVEMBER!

Debi at Easel and Quill is also playing along, so follow us both for Halloweenie goodness all month!

The first project is something I’d been working on for a while, and with all the crap this month, finally sent off in the nick of time last week. It is a box for a friend’s Halloween letterboxing event, and since it was yesterday, I can share the work without creating spoilers.

This is an altered book box. I picked up the book at Ross or Tuesday Morning–I just remember I got a good price. It was covered with twee Paris-themed stuff. Incidentally, I freakin’ hate twee Paris-themed stuff.

The surface treatment will be familiar to folks who followed along last year, though this time I used tissue paper rather than bog roll. It’s a slightly different effect, but much faster. The pentagram and skulls I hammered together in my smithy. Just kidding. The pentagram is actually layers of washi tape, with a flat embellishment for rivets. The skulls are from a bag o’ skulls I got…erm…either at Dollar Tree or Spirit Halloween. It was a while ago, and I picked them up because you never know when you’re going to need a bag of skulls. They were treated with VerDay paint and patina, which I bought a few months ago. I decided this was a good excuse to use them.

sg 02

On the coffins, I used the whole VerDay set, even mixing some colors. So. Much. Fun. I adore the one with the hat, where I used iron paint. I can’t show you the inside of the boxes, but four of them contain hand-carved stamps of various magical artifacts (like the Kris of Kross, that allows you to jump to any location), and two contain…surprises.  I’m gonna guess at least one of the surprise boxes comes back dented from being tossed across the room. Heh.

sg 03

Part of letterboxing is that each box has a logbook, where you can impress your signature stamp. The Spousal Unit helped me pretty up some paper, and I put it together with a French binding.

sg 04

Sometimes, I can’t keep myself from the pretty paper at the art store. Not sorry–this made a beautiful cover, along with a shiny skull that’s hard to photograph.

This whole project was a blast from start to finish. I got to play with new paints, and use a new bookbinding stitch. Good stuff.

sg 05


BONUS!

My friend Godda sent me this video to kick off Hallowvember. I’m sharing it despite the egregious misuse of “everyday.”


hallowvember icon large

Not burned out on Halloween yet? Want another month? Join me for Hallowvember!

I’d planned on doing this alone, but I’ve had inquiries, so I thought I’d open it up for participation.  If you’d like to keep up with frequent posting Halloween stuff on your blog through November, grab this icon:

hallowvember icon

Then leave a comment here with your blog name and URL. On November 1, I’ll publish a list of anyone else playing along.

halloween-72939_640

So October has been a terrible, terrible month. Except for my birthday. I had a really good birthday. But soon after, things went seriously pear-shaped.

I am finally healthy, and feeling cheated out of my usual October shenanigans. Well, screw that.

On November 1, I’m declaring Hallowvember. For the month of November, I will be making things, posting Halloween-related stuff, and generally getting down with my spooky self.  For those who actually enjoyed their October, it will be like two months of Halloween Season!

Over the next few days, I’m going to get a head-start on making things. See you on the first.