Archives

All posts for the month October, 2014

spiderchipnailedit-txt

I’ve seen the picture of spider chip cookies around quite a bit, so I had to try it. The Spousal Unit was on the computer at the time, so I went with my memory–that you simply pulled the warm chocolate out from the chip with a toothpick to form legs.

scf 01

I didn’t feel like baking from scratch, so I grabbed some Toll House dough. I baked them according to instructions, and brought out the toothpick…

scf 02

Unfortunately, the chocolate was hard and crumbly instead of smooth. There was no fixing this.

I had some fresh chips of a different brand, and thought that might do the trick. On the next batch, I took the cookies out a few minutes before they were done and added chips to the top. I gave them a few more minutes in the oven for the chips to melt.

Indeed, they were very melty and spreadable.

scf 03

A little too much so. The chip itself didn’t stay put when I tried to pull a leg free. I ended up with facehugger cookies.

Afterwards, I did some research (the perfect time for it, right?). This is the only place I’ve seen success with the plain toothpick method, and her recipe is very different. They aren’t drop cookies at all, but something much firmer.

Nearly every other baker who had any success either piped on the legs, or used a toothpick to apply chocolate that was melted separately.

But the plot thickens.  Look at this picture closely:

355560_e5e0_625x1000

See the logo in the lower left? Well, Worth1000 is a design site with photoshopping contests. This particular contest was called Snackimals (get a load of the pickled frogs), and the cookie was created by chther11. That’s right, it’s not real. I would have realized this if I’d looked more closely at it, but I didn’t. The whole toothpick thing made intuitive sense. I’d only seen the cookie passing through my Pinterest feed or getting posted to my facebook wall, and didn’t question.

Personally, I think this is hilarious. I wonder how many other folks have tried and failed. At a guess: everyone who later decided to pipe on legs!

I do not consider this a loss. It’s a good story, and we got facehugger cookies out of it.

facehugger


me 09

So I was wandering the dollar store, and I grabbed a bag of large glass cabochons. The kind most people put in vases. Me, I thought: monster eyes!

me 02

They were not all of equal clarity, so I placed them over some finely detailed paper, and chose the best.

me 03

Next, I grabbed an eye graphic off Pixabay, and changed the color to make it more seasonal. I printed it on glossy photo paper, and hit it with some matte sealer because I have a mere inkjet, and didn’t want anything to run.

me 04

I used a tiny amount of Glossy Accents on the back of the cabochon, and applied the eye. I pressed and kept pressing to work out as much air as possible, though there wasn’t much to begin with. Hard to photograph, but it makes a pretty cool monster eye.

Now, what to do with it?

Stink_Eye_-_Front

I know! How about a low-rent version of this awesome Jimmy Pickering piece?

me 05

I gathered a frame I’d been wanting to use. Don’t have to do a thing to it, I love it as is. Now, I could go all polyclay, but I was aiming for quick and dirty, so I went with purple felt.

me 06

I cut a slit in the felt, enlarging it until it fit over the eye to my satisfaction. I fastened it open over the eye with Scortape.

me 07

Next, I used hot glue to add folds for the top and bottom lids.

me 08

I glued it to the backing cardboard and trimmed, then put it back in the frame. It went in much more easily than I expected.

me 10

Voila! This took me about an hour. They eye is 1¼”, so you can see the whole thing is pretty small. Very easy last-minute craft for a little bit of creepy!

Raffle status: yes, I can mail this one.

ccc 09

As usual, I couldn’t resist the lure of all the Halloween magazines in the rack at the checkout.  If I have time, I’ll do a roundup. For now, here’s one idea I had to try: Candy Corn Cookies from Gooseberry Patch Best of Halloween 2014. They blogged about a similar recipe a while ago, but theirs is much simpler.  In fact, it’s so simple I’m going to go ahead and share it, since there’s nothing here that isn’t very, very basic.

Ingredients:

  • 1 cup butter, softened
  • 1 cup sugar
  • 1 teaspoon vanilla extract
  • 1 egg
  • 2 teaspoons baking powder
  • 3 cups all-purpose flour
  • Yellow and orange food coloring

Cream the butter and sugar together, then blend in the vanilla and egg. Whisk the dry ingredients together in a separate bowl then incorporate them slowly.  Line a baking sheet with parchment, and preheat the oven to 400 degrees.

ccc 01

Yes, I am fussy enough to use a scale.

Divide the dough into three equal parts.

Pretty!

Pretty!

Color one part yellow and one part orange. Use plenty of food coloring.

ccc 03

Rollin’, rollin’, rollin’

Roll each color into 3/4″ logs. I worked with half of each color at a time. The dough is very soft, but not sticky. It is not something you roll vigorously. A combination of squeezing and gentle rolling will do the trick.

Stripes! Call Tim Burton!

Stripes! Call Tim Burton!

Push the rolls against each other as firmly as you can without mooshing them out of shape. The recipe says to blend slightly on top. That won’t work.

Cutting the cookies mostly evenly. Mostly.

Cutting the cookies mostly evenly. Mostly.

Cut the cookies into candy corn shapes.

Moosh

Moosh

Before you put the cookies in the pan, turn them over gently in your hand, and blend the colors on the bottom as much as you can. They’ll still be delicate, but they’ll hang together somewhat.

Ready to bake

Ready to bake

These cookies don’t spread, so you can put them fairly close together, like I didn’t.

These gems have a wonderful texture. They are very buttery, and not over-sweet. If I were to make them again, I would add a touch of orange zest to the orange section, and lemon zest to the yellow section, for more flavor.

Also, they are very pretty:

ccc 08

Just look at them!

Just look at them!

I cannot even express how much I am enjoying everyone’s cards. Pretty sure this is going to become a Spooky Moon tradition.

On the left, in gorgeous purple, is a card from Amber Terry, who hails from Kentucky.  Next over, a very cool cat made of my favorite words from Kisah, here in Florida. Kisah has pointed me toward several very tempting swaps and gift exchanges over on Hauntforum. I probably won’t be able to resist joining a couple. Finally, on the right, is a card from one of my own papercrafting inspirations, Wyvern. Browse her site for some amazing work.

First, some more Cryptkeepers:

MyScaryHalloween

My Scary Halloween has tons of scary activities, plus a blog with even more!

boney1

The Ghoulie Guide

The Ghoulie Guide is all things spooky, with an emphasis on media.

Halloween Holler

Halloween Holler

Halloween Holler is an old fave of mine. Always something spooky!

On The Stick

On the Stick

On the Stick is a games blog, and for October they are doing 31 days of horror games.

And now, more linkies…

Wow, Mr. Chicken makes this look easy.
IMG_20141012_0059

Gypsy Witch Fortune Telling Cards at Garage Sale Finds

OTIS does silly things with skellies. Again.

OTIS does silly things with skellies. Again.


Halloween Rolling Pins

Halloween Rolling Pins

Also ghosts, skulls, and general Halloweenieness. Via 2nd Street Cemetery.

Halloween art and ornaments by ARyer Studios

Halloween art and ornaments by ARyer Studio

–via Darklinks


sb 10

Inkle, Punkle, and Thrum

Today’s project is inspired by the work of Maureen Carlson.

carlson

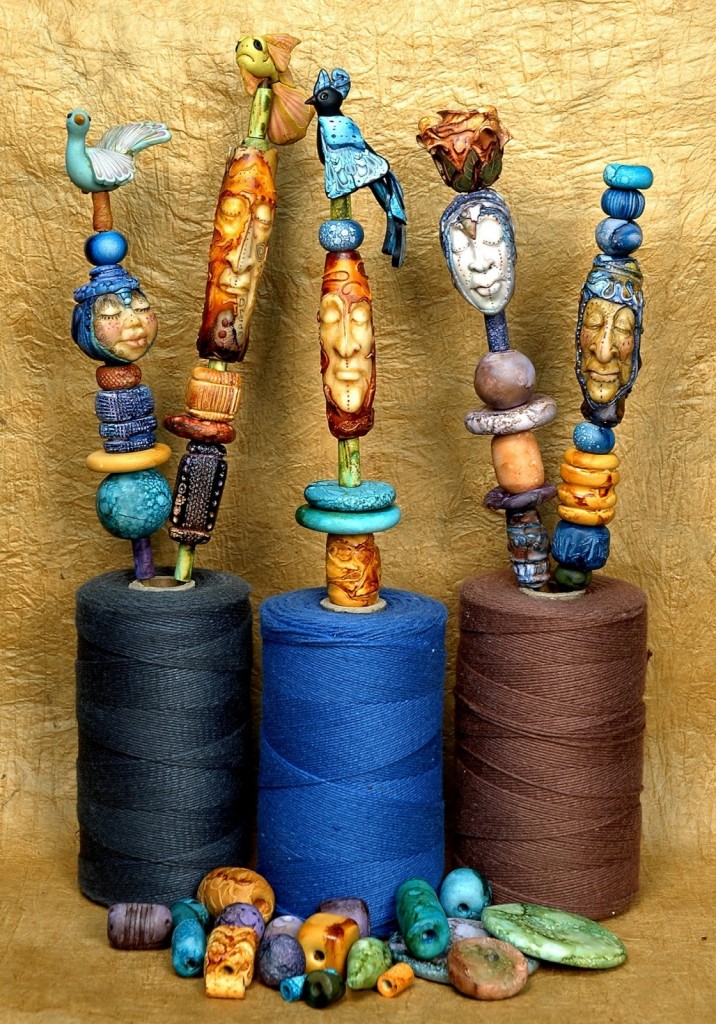
Maureen Carlson’s Stacked Totems

I came across her stacked bead totems in an issue of Polymer Cafe. I knew someday I had to try it. When I was brainstorming for my Month of Spookdays this year, I remembered her fantastic bead stacks. They had to get the Halloween treatment.

The stacks consist of a base bead, which should have a tight fit, fill beads, face beads, and finials on the top, which are only pierced on the bottom, and should also have a tight fit.

sb 01

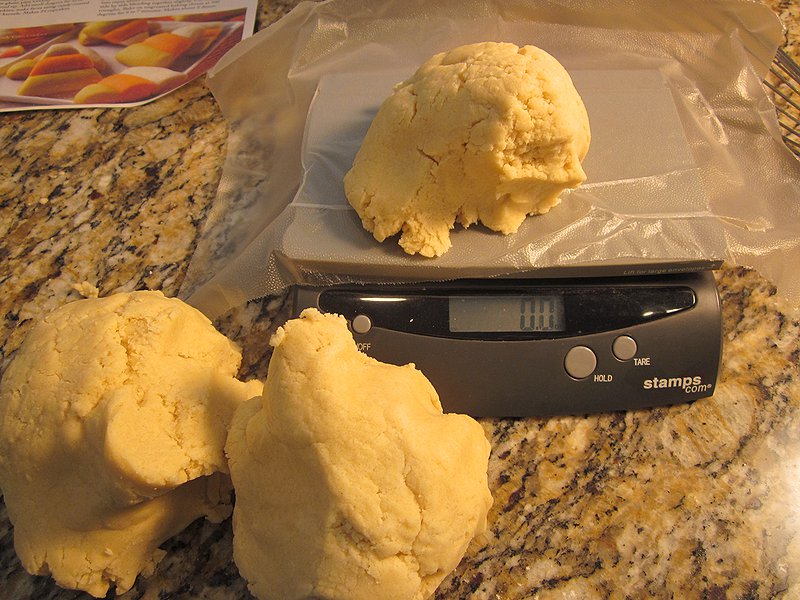
I started by grabbing some Sculpey and making a few faces. These would become molds I would use for beads. I’m using Sculpey for this project because I have a lot of it, and want to get rid of it to make room for better clays (because now I have one of these magnificent beasts, and can condition harder clays without killing my hands). I ended up deciding the long face was too big. Also, it didn’t mold well, because I suck at making molds. Instead, I sculpted a little cat face (Thrum) right on the bead.

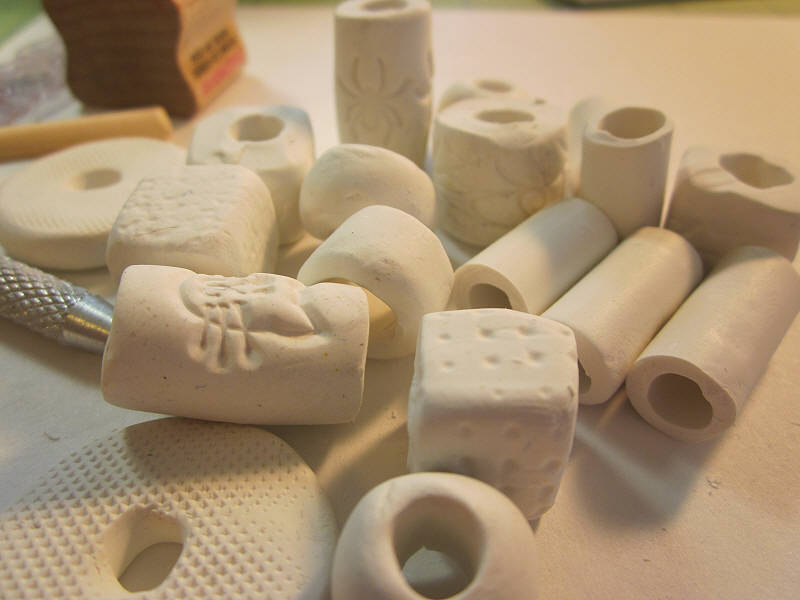
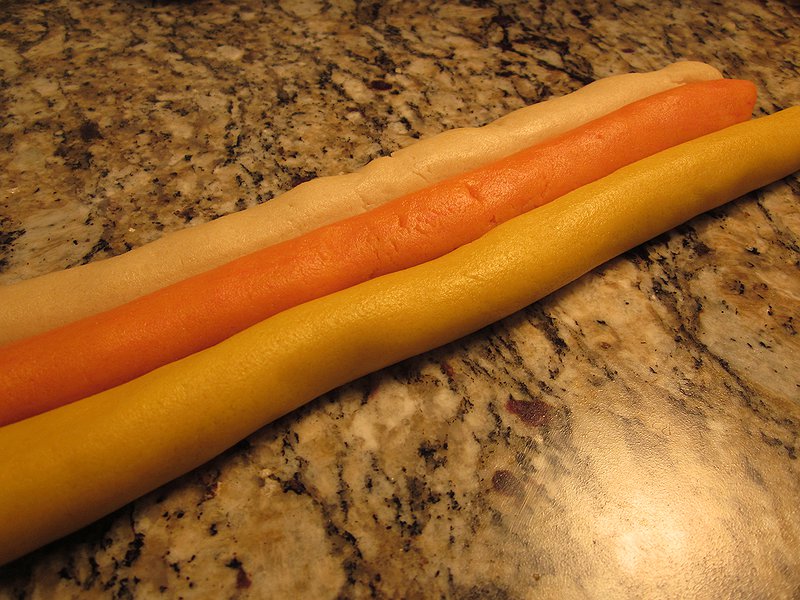
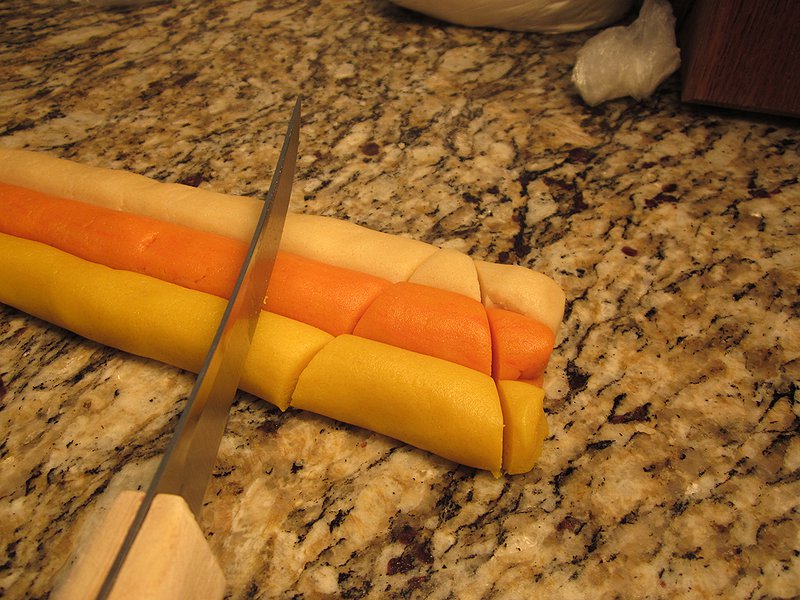
While I was curing molds I started making the other beads I would use on the stack. I used stamps, texture plates, even the grip on my sculpting tools to get texture. The long tube beads were made by making one long tube and cutting after baking. That worked better than I thought it would.

I used a knitting needle for bead piercing. If the clay is too soft, it helps to pop it in the refrigerator for 30 minutes. Now, I could have made these beads all neat and perfect, but I was already over schedule on this project, so I left them a bit primitive. I’m okay with that—I think it adds to the charm in the end.

The beads are colored using alcohol inks and a spray bottle full of 91% rubbing alcohol. Mix alcohol and ink in a small cup, and roll the beads around in it to “pot dye” them. Afterwards, play with dripping, spraying, and wiping back with a paper towel. I decided these beads weren’t dark enough after pot dying, so I dripped some straight purple on them and turned them over the dye pot.

I made sure my three base beads were the only green ones, as they fit much more tightly than the filler beads.

On the face beads, I also used quite a bit of Copic Marker, for greater control.

Here are the beads ready to go in the oven to set the dye. If you make beads, I highly recommend a baking rack!  After dying, bake them the same way you would the clay. After that’s done, they get a very thin coating of liquid polyclay. I emphasize very thin, because I had some drips and sticky parts I had to smooth down and re-bake. In the foreground here, you can see my finials a little.  I made a witch hat, a ghost, and a moon. I used a stylus tool to make little dots that would catch pigment, and gave them a bit of a shimmer with pearl ink.

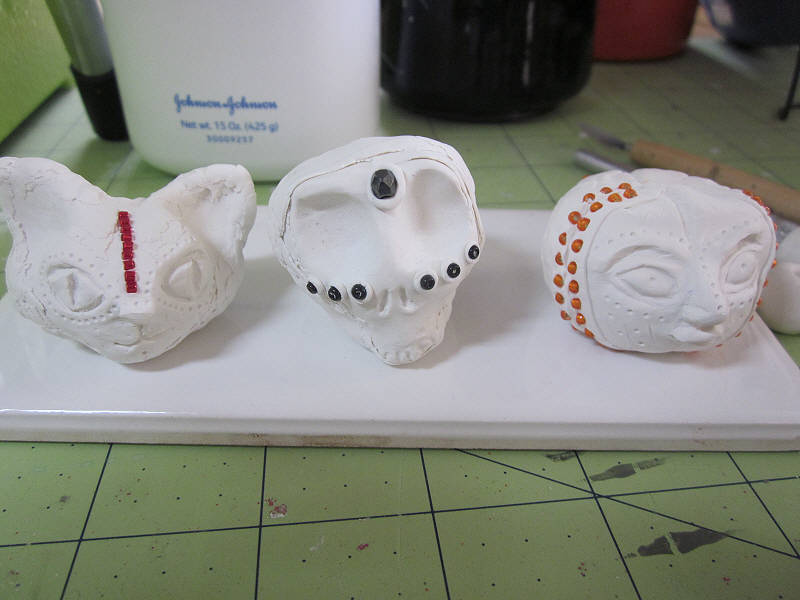
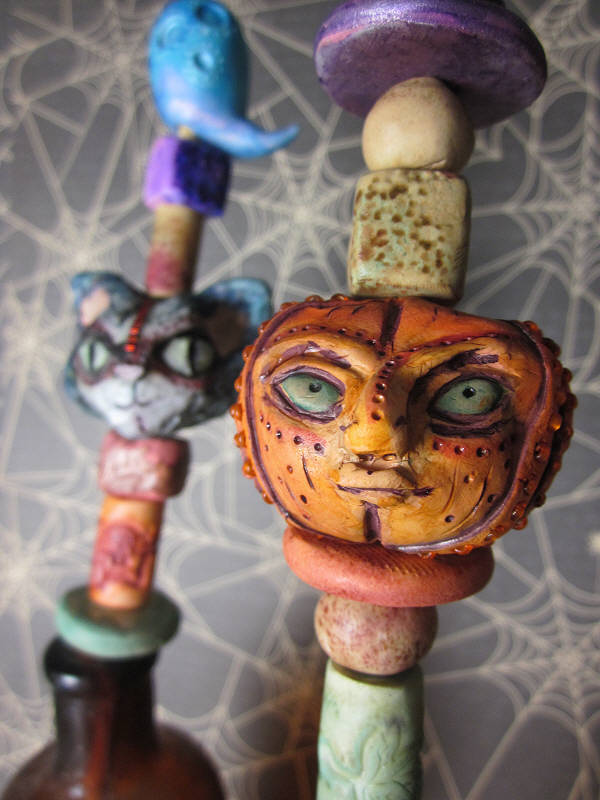
Here are Thrum, Inkle, and Punkle after their first cure.

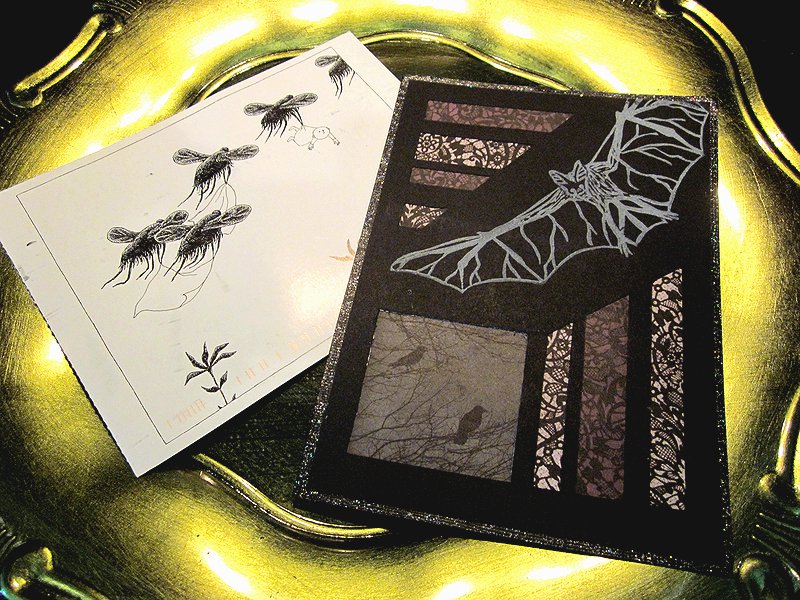
Carlson has several great techniques for adding ink-catching texture. My new favorite is rolling out a very thin sheet of clay, tearing it into bits and layering it on the bead. She likes to tear it into strips to frame her faces.  She also cuts slits in the surface, and inserts beads (see below).

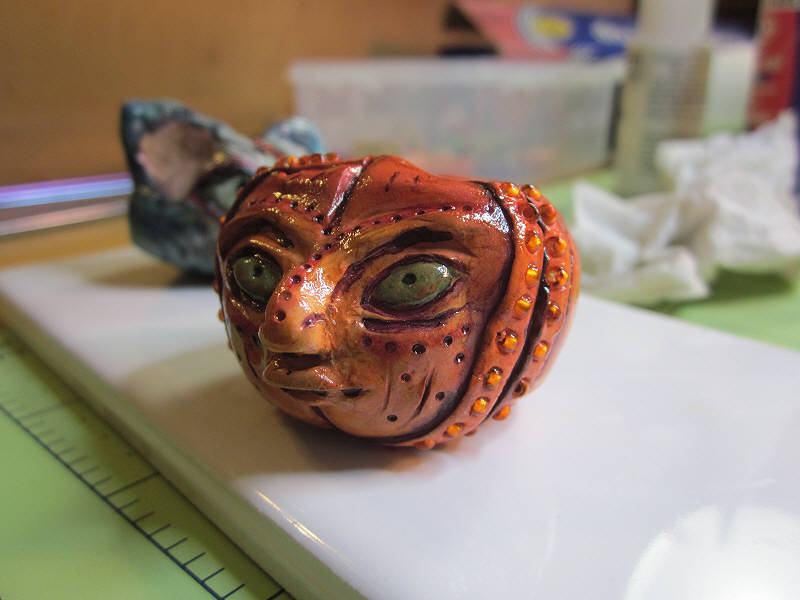
Here’s Punkle (with Thrum in the background) with a coat of liquid Fimo, ready for a final bake (don’t worry, I only put it on the top half. Then I figured out he’d fit on the rack, and coated the rest of him.) The beads are baked a total of three times: once after sculpting for the initial cure, once after applying ink, then once after applying liquid polyclay for a final protective coat. Punkle, I admit, is my favorite of the face beads.

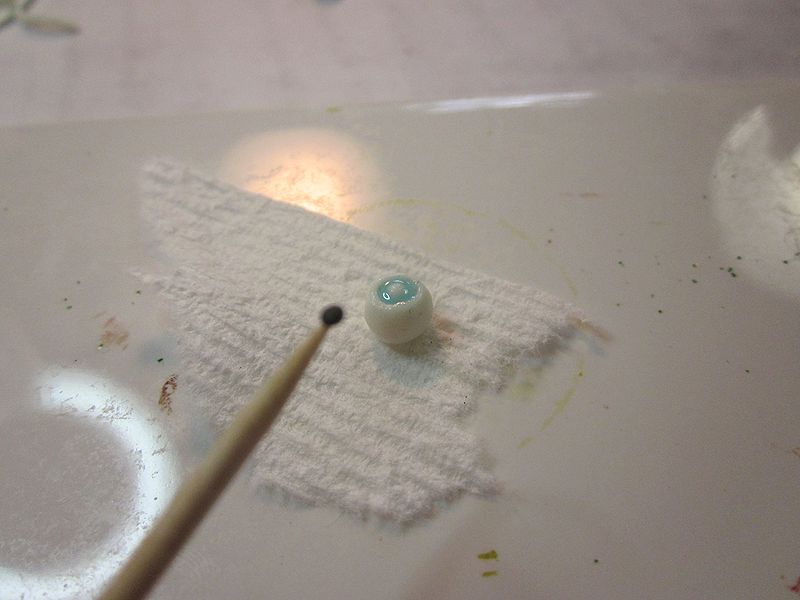
Here’s a detail shot of Punkle’s back, where I cut slits and inserted beads. If you use beads, insert them deeply, so they stay. I also like to use a tiny, tiny bit of liquid polyclay before I apply beads. It acts as a glue, and makes a very firm attachment.

To get the color on Punkle, he was first pot dyed in orange, then I took an Argyle Purple Copic and went over the edges in small sections. Then I put a little alcohol on my finger, rubbed it lightly over the Copic, and wiped back. I also ended up using a yellow Copic over the whole thing to warm up the colors. A Lipstick Red Copic was used over the dots in the face to make them stand out, and a few different green Copics were used for the eyes.

I started to make stands, but I wasn’t happy with them. If you’d like to make stands, form a conical armature from foil. Give it a wide base and pack it tightly. Add a layer of scrap clay, then a layer of top clay. Pierce the top deeply so it will hold your stick. Add details, then go through the same baking and coloring steps as the beads.

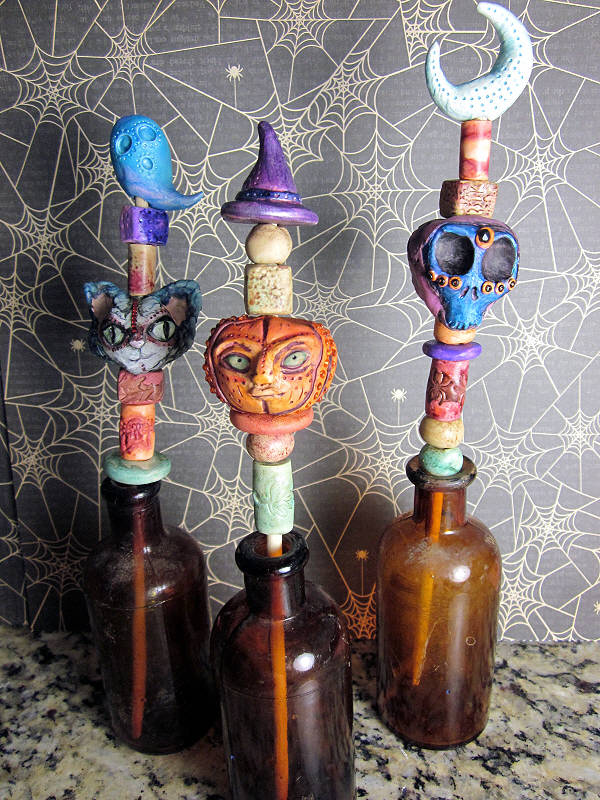
Since I didn’t like how my stands were going, I wondered what else I could use. Duh—bottles! The vintage bottle I used to form my Makit & Bakit Votive Sleeve has siblings (and at least a dozen cousins). Here they make an appearance as stands. I used a chopstick to hold the beads. Chopsticks are always handy—I get them in huge bags from the local Asian grocery.

I like this a lot better than the stands—the old, dusty bottles add to the rustic feels of the dolls.

Raffle status: Yes, these will be going, minus the bottles. You will have to get your own bottles.

sb 01

The Spousal Unit is a research scientist, and sometimes he brings home interesting things that would otherwise be discarded. Like this tiny bottle. Naturally, I had to do something creepy with it.

sb 02

I didn’t use any liquid inside the bottle, so the necklace would be worry-free. I’ve never been great at distressing the inside of bottles. I should probably look up some directions one of these days. Here’s my first run, with alcohol inks, I think. Maybe glue. And stuff. Didn’t stand up well. I finally went for Vintage Photo Distress Ink, from the re-inker bottle. I moved it around and hit it with the heat gun for texture.

sb 03

Once it was completely dry, the inside got coated with Glossy Accents, so my “specimen” wouldn’t scratch the color off the inside. Heat gun again, because it made pretty bubbles and things. I suspended the bottle upside-down over paper so the Glossy Accents could drain out. I let this dry overnight.

sb 04

A result I like, and it’s plenty sturdy.

sb 05

Next, the specimen. I chose Cernit because it’s extremely flexible without breaking. That means I can shove something tiny into a bottle.

sb 06

I rolled a very thin snake, wrapped it around a toothpick, and gave it a little texture with some play foam. The “guts” were baked before moving on. Sadly, some of the center bit had to be removed to fit in the bottle.

sb 07

All specimens need creepy eyes, right? This is a tiny, tiny ball of Cernit. I used the end of a retracted pen to get the basic shape of the iris, then used the awl to further narrow the pupil and shape things.

sb 08

I was at a loss as to how to color the liquid Fimo for the iris blue, as I didn’t have alcohol inks in the correct shade. StazOn refill to the rescue.

sb 09

I carefully used a toothpick to fill the iris with a layer of Fimo. I made a tiny, flat dot of black Cernit and placed it over the pupil, and added another layer of liquid Fimo to fill in.

sb 10

Ready to bake! They didn’t stay glossy, but they still looked pretty nice in the end.

sb 11

Using tiny dots of Cernit and liquid Fimo, I attached and baked on the eyes one at a time.

sb 12

In you go!

sb 13

Next, I grunged up some medical gauze. I used acrylic paints rather than ink, so the color wouldn’t run.

sb 14

I folded the gauze over several times, put it other the top of the bottle, and wound the excess around. Then I used some black yarn to further seal the bottle, and add a loop for attaching to the necklace.  All of this got tacked down with Helmar, then coated in hot glue for strength. I wasn’t keen on using wax to seal, as I didn’t want it to chip off during wear.

sb 15

Instead, I melted some ultra-thick embossing powder, and colored it with very small amounts of crayon.

sb 16

Drip drip. Holy crap, that is super gross. Win!

I love this project. It’s very light and durable, and here’s something special…the Cernit I used is phosphorescent. That’s right, if you go into a dark room, the specimen gently glows.

Yep, I’ll be sending this one off to some lucky raffle winner. For certain values of “lucky.”

sb 17

hv 01

This weekend we went on a haunt bender, with Hellview Cemetery as the topper.  As I usually try to do, I stopped by a little early for some daylight shots.

hv 02

Dueling Minecraft torches.

I always plan to take five minutes getting shots. It never works out that way, because I gotta talk to the people. I met Nikki (left) and Rin, fans extraordinaire (seriously, they talked about subfandoms I’ve never heard of), and helpers at the haunt. Nikki is an actor–and I didn’t spot her as I went through, which is impressive. Rin is one of the guides for the Scooby Doo tours, the less-scary version for munchkins. We had a great time talking. I’m glad it wasn’t too hot, or the Spousal Unit would have roasted waiting for me in the car.

Before the haunt opened to the general public, a couple of special groups went through. You can see a few of the Harry Potter folks in the background here.

hv 03

There were also some lovely Whovians, including this fan in her awesome dress and matching kicks.

me n stella

I also talked a bit with one of the organizers, Sally Gage. I didn’t get a picture of Sally (dangit!), but she let me hold her baby. This is Stella. She was such a sweetie, didn’t howl or anything.

We talked about the background of the hosts, many of whom hail from Halloween Horror Nights. They wanted to do something local, but still spectacular, for those who aren’t up for a drive to Orlando.

hv 04

It’s difficult to gauge the size of the haunt from the outside. The entrance is near the exit, but that doesn’t mean anything. The facade is impressive, with some very nice foam work creating columns, stone walls, and a cathedral-like entrance.

hv 06

Mark Muncy, the Caretaker, and owner of Hellview, welcomes victims inside.

The answer to how big: big. They have a fair bit of space, and use it well. Hellview lacks the usual claustrophobic feel associated with haunt mazes. Instead, it is mapped more like an amusement park ride, with the viewer moving from one large set to the next. The sets are fully realized, and rich in detail. If there’s one flaw, it’s this: the actors are too good. There was more than one instance where I wanted to stop and watch the mesmerizing performances of these charismatic professionals. Yep, toward the end of the haunt, the actors were saying (ominously, of course): “Move along! Faster, faster!” Heh, oops. Of course, that may be because the folks behind us were frightened, and running through. They were on top of us by the end. Chickens.

I will say the lighting could have been more dramatic. The Caretaker especially could have used a scary light on his face (mostly so I could get a better picture!), but it was still dusk, and it was their first run of the season. According to Sally, they had just finished the lighting, so I don’t think I got the best look at it.

Hellview was amazing. I may go up to Orlando next year to see the “big ones,” but for the most part, I think I’m done with pro haunts. They just aren’t as creative, they don’t show as much heart and art.

hv 05