Archives

All posts by frykitty

A big welcome to my fellow Cryptkeepers who have wandered over because of this post. I’ve already made a couple new friends. Or, as the Spousal Unit would put it, I have added to my Creepy Cohort.

I’ve added most of the other Cryptkeepers to my feed, and have been enjoying following them. Here are a few more for October:

Monique's Pretty Dark Art

Monique’s Pretty Dark Art

Monique is a paper crafter doing some impressive work. I especially love the pictured star, and this coffin shadowbox.

wtf2013banner

Gef Fox is a book blogger focusing on dark fiction, as well as hosting some interesting guest posters. I may have to read this Elf on a Shelf horror tale.

facebook+copy

2CoolGhouls cover mostly media, with a few general Halloween posts thrown in. Here’s a neat roundup of 80s horror television shows.

Something Got Me Started

Something Got Me Started

Author Stephen Couch is writing a horror novel, Face After Face, over the course of the month. Here’s the first installment.

Now, on to linkies (you’ll see more Cryptkeepers amongst them)…

Skull Candles of London

Skull Candles of London

Via Skullspiration

Roald Dahl's 1967 horror show, Way Out.

Roald Dahl’s 1967 horror show, Way Out.

Cambiare, Japanese bar based on Suspiria

Cambiare, Japanese bar based on Suspiria

And another, Biohazard Cafe & Grill, based on Resident Evil

And another, Biohazard Cafe & Grill, based on Resident Evil

Both via Gravedigger’s Local 16

You can still find this on Amazon

You can still find this on Amazon

Miskatonic University Archaeological Dig Kit

Miskatonic University Archaeological Dig Kit

Cthulu Mosaic to adorn your ancient bath house

Cthulu Mosaic to adorn your ancient bath house

The art of Heather Gleason

The art of Heather Gleason

via Fright Connection

lg 13

Sometimes I go thrifting for the fun of it. I’ll get out $20 cash, and go from thrift store to thrift store, looking for interesting things that spark ideas.

lg 01

When I saw these swirly lampshades for 50 cents each, I thought of delicate ghosts.

lg 02

After much experimenting, the ghosts ended up consisting of clear labels, transparency sheets, and tulle.

lg 03

I noticed an electric votive fit into the lampshade very nicely, so I took advantage of that. I cut down transparency sheets to about 5-1/2″ x 4-1/2″.

lg 04

I fiddled around with some photographs, and came up with three faces.  Here’s a PDF if you would like to use them. I made this sheet, and printed it out on clear label stickers. I printed two so I would have an extra, and also so I could use the second one to guide placement.

lg 05

Facial features get fussy cut. If the nose and mouth were very close together, I left them attached.

lg 06

I laid the transparency down in landscape orientation, and placed the guide face in the middle, near the top. I then used it to stick down the features.

lg 07

The transparency is rolled around an electric votive, and held in place with a bit of tape.

lg 08

Tape goes on the top seam as well. It won’t show.

lg 08a

I’m using a 6″ wide roll of tulle I got from the dollar store. Cut 4 to 6 lengths of about 15″. The number of lengths depends on your taste in tulle. These ghosts have 4 and 5 lengths.

lg 08b

Smoosh the tulle so it gets all wrinkly. Not only will it look better, it handles better as well.

lg 09

Place two lengths of tulle over the bottom of the lampshade, crossing one another.

lg 10

Push the transparency with its candle down on the tulle, into the lampshade, until the candle is just under the lip.

lg 11

Place a piece of tulle over the opening of the transparency roll, and push it down. Do this with the rest of your tulle lengths, crossing each piece.

lg 12

Add another electric candle under the base, and you’re done.

These look best in the dark, and would be nice on a spooky black-and-white table arrangement.

Raffle status: Sorry, too delicate to ship.

lg fin

gab 12

Mine! Allll mine!

I’m in love with these cookies. They are delicious and elegant. In fact, they’re so nice that the Spousal Unit and I decided to withhold them from his co-workers, and keep them all for ourselves. I’ve adapted the recipe, with several method changes, from My View from the Avenue. For this recipe, you will need a 3″ round cookie cutter, plus mini bat and ghost cutters.

gab 01

Creaming the butter and sugar. Sounds dirty.

Yield: about 3 dozen 3″ cookies

Ingredients:

1 cup (2 sticks) butter, room temperature
1 cup sugar
1 large egg
2 teaspoons vanilla extract
2 2/3 cups all purpose flour
1 teaspoon baking powder
1/2 teaspoon salt
1/4 cup unsweetened cocoa

  • In a large bowl, cream the butter and sugar until fluffy. Beat in the egg and vanilla.
  • In a separate bowl, whisk together the dry ingredients, except for the cocoa, until lump-free.
  • Slowly add dry ingredients to the creamed mixture, stirring until thoroughly mixed.
  • Remove half of the dough and knead on a lightly floured surface for about a minute*. Form into a disk, wrap in plastic, and set aside.
  • Add cocoa to bowl, and mix until the dough is completely brown, with no little white spots.
  • Knead the chocolate dough, form into a disk, and wrap. Chill both doughs in the refrigerator for at least 3 hours.

*I didn’t really see a reason to knead the dough, but I did it anyway. In the original recipe, this is used to mix in the cocoa, which would take forever. Feel free to skip the kneading and see if it works out. I think it will be fine.

gab 02

Ready to chillax

Fun part, coming up!

Fun part, coming up!

  • Preheat the oven to 350°, and line a baking sheet with parchment paper.
  • Break off about 1/3 of the chilled dough.
  • Lay down a sheet of Press ‘n’ Seal (I’m not a shill, but seriously, this stuff is so much better than plastic wrap)
  • Flour the plastic lightly, and work the white dough in your hands for a few seconds.
  • Pat it down as much as you can, then flour the top of the dough. Roll with light, short strokes to about 1/8″ thickness.
You seriously don't want to lift these with your fingers

You seriously don’t want to lift these with your fingers

  • Cut five 3″ rounds.
  • Using a scraper or very thin spatula, gently lift the rounds on to the parchment paper. These cookies don’t spread, so you don’t need a lot of space between them. This dough is very tender, so you want to move it as little as possible. Reshape if necessary.

NOTE: Watch your plastic for tears, and replace immediately if this happens. I went through several sheets. You also might want to check the bottom of the last few cookies, though I didn’t end up with any problems.

Na-na-na-na-na-na-na-na

Na-na-na-na-na-na-na-na

  • With the white rounds in the pan, cut out bat shapes from the middle.
Lift and pull

Lift and pull

  • Remove the bats by gently lifting the paper beneath the cookie, and bending at the seam of the cut-out. Now you can grab the bat. You don’t need to worry about the bats staying nice, just add them to the leftover white dough.
  • Using the discarded bats, you can cut out one more round, and still have enough for ghosts.
Mmm...chocolate

Mmm…chocolate

  • The chocolate dough is slightly less moist than the vanilla, but you still need to flour everything. Pat and roll out a small amount, and cut out six mini bats.

NOTE: if the chocolate dough becomes crumbly from the additional flour, put a few drops of water on your hands and work it in to the dough.

This part is kind of magical

This part is kind of magical

  • Lay the chocolate bats into the space on the vanilla cookies.
gab 09

Cracks, seams, etc., are very easy to fix with this dough

  • There will be a bit of space between the chocolate and vanilla. Gently press all around the shape (I actually used two fingers, one on the shape and one on the round), joining the seams.
  • Now repeat all this, but with chocolate rounds, and vanilla ghosts.
gab 10

Om to the nom

  • Bake until vanilla cookies are very slightly browned, about 15 minutes. The original recipe says to chill before baking. I saw no reason to do that, so I didn’t.
  • Let the cookies cool completely, then put them somewhere else and shape the next batch of dough. You can use the same parchment paper, but change out the Press ‘n’ Seal.
For the curious: those are roast beets in the background. The Spousal Unit loves 'em.

For the curious: those are roast beets in the background. The Spousal Unit loves ’em.

For the leftover dough, I mixed it together and made a bunch of tiny moons, and baked them in between the last batch.

gab 11

There are currently three left. Oops…two now.

The crispness of the cookies is determined by thickness. Since mine varied wildly, I had a combination of lovely crisp cookies, and slightly soft cookies. Both were wonderful.

cs b 02

I was poking around Pinterest, and I kept seeing neat coffin shrines. When I went to prepare this entry, I learned they were all from the same place: Immortal Visions. She makes lots of delightfully spooky things.

inspiration cs (3)
For my own coffin shrine, I decided on one of my favorite themes: the ghost bride. As a further challenge, I decided I would use no wet media. No edge distressing, no antiquing. Just cutting and gluing. I only broke my rule twice, and it was touching up, not altering.

I already had a few little wooden coffins, but I inherited a bunch more, including some that were pre-painted black, from a friend. Time to remove the hardware. I put it in a Ziploc and saved it. You never know when you’re going to need a tiny hinge.

While the touch-up paint on the coffin was drying, I got out the stuff. Good times in the paper closet, the lace drawer, and the Halloween bins. I didn’t use everything here, and of course, I found other stuff to grab later.

In Immortal Visions’ shrines, she uses the coffin lid as a base. I chose several papers for this project, in purple and orange. This goes on top of the lid.

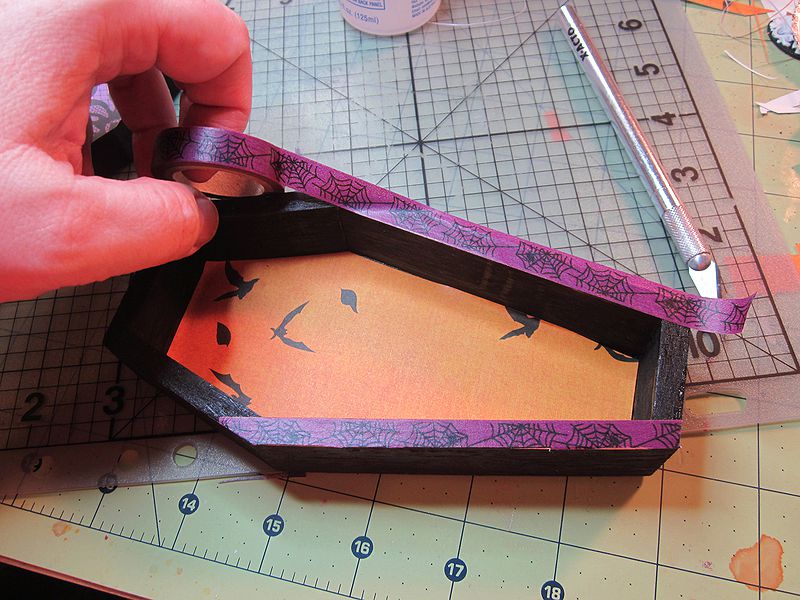
I lined the shrine with orange paper, and edged with washi tape.

Important thing I didn’t take a picture of: that orange paper had a nice graveyard on the bottom. I grabbed one of the stones and used it as a template to cut out with different paper. I cut out a center bit, and added a printout from a vintage photo.

The outside of the shrine gets more washi tape.

The gravestone was for the front of the upright, along with some purple roses I’d cut from another paper choice. Working on the inside of the shrine, I cut this cameo from another paper collection, and attached it with foam squares.

Much stringing of tiny plastic pearls.

Then with the hot gluing of the tiny plastic pearls.

Paper flowers will cover that glue mess.

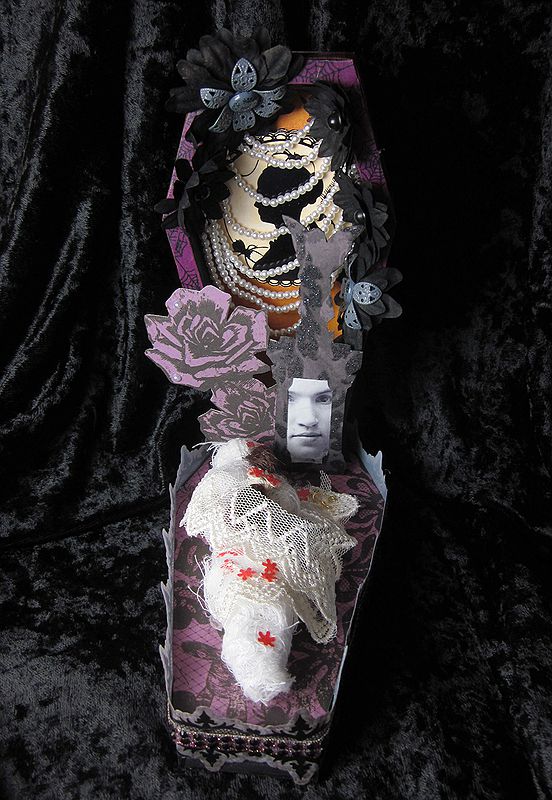
Everything is attached, and the shrine top is done. On to the base.

First things first, lets shroud a doll! I actually thought I was going to wrap her arms separately, but I realized I could blast some heat on them to get them to bend a bit. So the doll got unwrapped.

Glue wasn’t going to do it, so her arms got pinned into position with Scor tape. We, uh, won’t talk about me cutting her feet off to make her fit. Yes, I saved the shoes. You never know when you’re going to need tiny shoes.

Once our unfortunate bride was all shrouded, leaving her lovely braid out (because hey, extra creepy hair!), I decided I wanted some tiny flowers. At first, I tried fussy cutting some out of scrapbook paper. I didn’t like the results or the amount of work I was looking at. So hmm…what do I have that can cut a tiny flower? Well, a Christmas edge punch, of course!

The only red that made me happy was the tissue in a heart doily. Go figure. So I cut off the fiddly bits around the solid heart, and managed to get a few flowers out of each one.

Two gold jump rings were tied together and glued on to lace, which winds delicately around the bride.

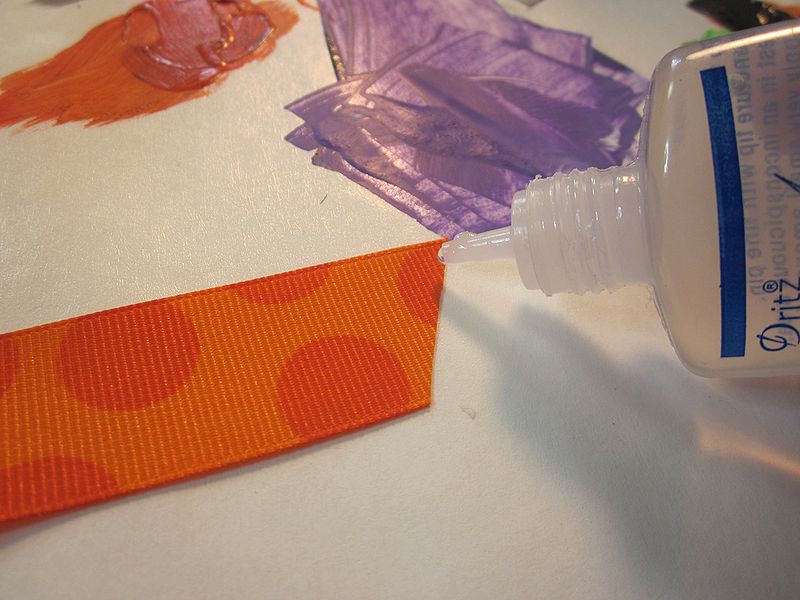
A Halloween border, from a pile I’ve been wanting to use, edges the base. That border is a sticker, so I carefully applied PVC glue to the top half to get rid of the stickiness.

When I was going through my Shiny bin, looking for accent pearls, I found this fantastic ribbon I bought years ago at a shop in Portland. It had to go on too.

Close shot of the top.

Here’s the middle bit, with the vintage photo. Tres spooky, oui?

Poor Bride. So young, so lovely, so dead.

Raffle status: Sorry, too delicate to ship.

Enter if you dare

Enter if you dare

Radley Haunted House was our first haunt visit of the season, and what a way to kick things off. The story this year is about the unfortunate Dr. Radley, who obtained a mysterious statue, unleashing a nightmare god who torments him in his sleep.

The queue film is important to the setup. This professionally produced short by Andrew Ford tells the story of Dr. Radley, and the genesis of his nightmare machine. Give it a watch:

The office set is the first room you enter. The film sets you up to experience the story as you walk through, and it’s very effective.

Setting up

Setting up

We arrived at about 7:00pm, 30 minutes before opening. We got a good parking spot right across the street, and watched the haunters get ready. The haunt cost nearly $15,000, part of which was provided by a Kickstarter. All that funding didn’t go to waste. The score, the film, the details, and the freakin’ amazing costuming all shines.

The line just before opening

The line just before opening. Can you spot the Spousal Unit?

The two girls in line ahead of us were what I call “screamers,” teenagers who love to be scared, but, well, they’re scared.  One of the setup guys (in fact, it was Dr. Radley from the queue film) walked along the line, and the little brunette asked: “Is it scary?” Heh. He answered: “Nah, not at all.”  I laughed and laughed. It was kind of an evil laugh.

Folks went in 2 or 3 at a time. When we entered the first room, the girls were still there, afraid to go on. They begged us to go first. I took the lead, and the Spousal Unit brought up the rear, so they would be surrounded by safe, older folks who don’t scare easily. It didn’t take long before my charge had to hold my hand, and I pretty much dragged her and her friend through, with Bill occasionally pushing from the back. They were so terrified. It was adorable.

You won’t get any spoilers from me. I will only say that this is one of the finest haunts I have been to, pro or home. I class it with Baron von Gooloo’s regular gig at Fright Town in Portland, Oregon.  The reason is originality. So often, the story is just a loose prop that allows haunters to drag out the same old tropes. At Radley House, the rooms firmly support the story. The actors are great, and the costuming–well I think I already mentioned that.

This was a fantastic experience, and the perfect opener for haunt season.

rad 02

Radley House is at 3900 19th Street N, St. Petersburg, FL 33714.

Dates: OCT. 9th-12th, 16-19, 23-26, 30-31, NOV. 1-2

$5 donation is appreciated.

I’ve changed the deadline on the raffle to October 29, because I don’t need 11 days to organize a drawing, for pete’s sake.

Here’s a reminder of how it works:

  1. Leave a comment with a valid email address, telling me you’d like to enter the raffle. Your address won’t be publicly visible.
  2. I will email you my physical address.
  3. Send me a card. Handmade or store-bought doesn’t matter. It doesn’t even have to be a card–just something Halloweeny.
  4. I will post your card on the site, just sayin’.
  5. Your name goes in the hat, and on October 31, I will post a complete list of the available raffle items. I’m even throwing in some crafts from previous years!
  6. I start drawing names. First name gets first pick, and so forth.
  7. Winners get loot. Unless I get a whole lot more entries, everybody is going to get loot, because I like to make things.

Drink Can Box by Atomic Shrimp

Drink Can Box by Atomic Shrimp

My inspiration for this project is an embossed aluminum box by Atomic Shrimp.  I read the directions, I watched the video–I even watched the FAQ video linked at the end of the instructional video. I still ended up doing a few things differently–but mostly I followed directions. I can do that. Sometimes.

sc box 01

We begin with a can of my favorite soda. My can is not as big as those for energy drinks, so I have less room to work with. This is the diagram from Atomic Shrimp. I didn’t end up using it.

sc box 02

First: cut an aluminum sheet out of the can. I found it was easier to start the top end with an craft knife, then I cut the rest with scissors.

sc box 04

In the video, he sands the paint off a full drink can. In the photo tutorial, he tapes down the cut out sheet. I preferred the latter. We used to go to a bakery that was right by a nail salon. The salon gave out maintenance kits that sometimes got dropped on the way to the car. That is how I obtained the free block sander that worked perfectly for this project.

sc box 03

I figured out a box shape that would use as much of the can as possible. Graph paper was my friend, as I am terrible at measuring things.

sc box 05

I incised the guide lines with a ball-point pen. I was a little too careful of breaking the metal, and didn’t push hard enough. Most of these lines had to be re-incised later.

sc box 06

Note the double-lines on the flap. That’s so the flap can fold over sharply without breaking.

sc box 07

I drew some light lines to guide my design.

sc box 08

I incised the design with a ball-point pen on the inside of the box.

sc box 10

To go around the design on the outside, I used a stylus, since I didn’t want ink to show. At this point, for no real reason, I decided it was time to cut out the box.  Here’s something I modified: I cut the corners of the flaps at a slight angle. This makes them fold over and fit much more easily.

sc box 12

Now the inside has been re-incised, and the design is complete.  GREAT BIG IMPORTANT NOTE: If your hands are weak or injured, don’t even try this. All the pressing to incise the design hurt. A lot. My mild tendonitis flared up like mad, and I was in a wrist brace for weeks. Heed my warning–this project is for tough fingers.

I notice the metal is a bit curvy. That’s going to make it hard to fold.

sc box 13

Naturally, I iron it. It took a few minutes on high heat, but it didn’t hurt the design, and it helped flatten the metal sheet quite a bit.

sc box 14

The corners got incised on the top side so they’d bend properly, and I folded according to instructions. I could have used an extra hand, but it turned out okay.

sc box 15

To make the bottom half, the center is 1/4″ smaller, and the sides are as much bigger as I could get out of the material.

sc box 16

I didn’t want to do any more hand incising, because OWIE, so I decided to try running the sheet through an embossing machine. I chose a kind of mottled gothic pattern.

sc box 17

It isn’t as deep, but it still looks pretty nice.

sc box 18

I decided not to sand the bottom, because I didn’t need a clear field to incise the design. This way I get to see where the box came from.

sc box 19

The lid is a little big, but I like it! Though I have to admit, I wouldn’t do it again by hand.

Raffle status: this thing is pretty delicate, but I think I can ship it.

sc box 20


bow 08

I had this 25-cent bowler I picked up at a garage sale. I swore I wasn’t going to paint it. I wasn’t going to turn a 2-hour project into a 2-day project. Yeah, that worked out. I used:

  • Bowler (garage sale)
  • Skulls (dollar store)
  • Death figure (part of my Secret Pumpkin gift)
  • Flowers (garage sale)
  • Ribbon (Michael’s, $3.99)
  • Purple garland (stash)
  • A bunch of acrylic paint

bow 01

I started by gathering possibilities, and narrowing them down.

bow 02

See those flower things there? Totally on the first iteration of the bowler. The one without paint.

I thought the wonderful Death figure would look great riding on my bowler. He’s a little heavy, but it still works.  I added in skulls, a silky band from the same garage sale as the bowler, and some purple garland from my stash. I finished it. I took pictures. I hated it. I pried off everything but Death and the skulls, taped up Death’s legs, and started painting.

bow 03

Unsurprisingly, I had to go over everything several times to get much vibrancy against the black velvet of the hat.

bow 04

Bit by bit, the hat is painted in white, orange, purple, and a touch of green. I especially love the green on the skulls.

bow 05

That purple stuff gets glued on again, and a new hatband is attached. I actually purchased this ribbon, when nothing in my stash proved satisfactory.  That’s right, I spent actual money on this.

bow 06

Said ribbon got some Fray Check on the ends as a finishing touch.

bow 07

Lastly, from the same box as the Makit-Bakit crystals came a bunch of silk flowers mounted on stick pens. Off they came, to be attached to my hat.  And it is festive indeed.

bow 09

Sorry, this hat will not be in the raffle. It’s too delicate to ship. Also, I want to keep it.

First order of business:

marm

The second raffle card has arrived! This one is from Marmalade, who I happen to know is an intrepid explorer and hunter of tupperware, as well as being a very talented crafter.

Now, allow me to introduce a few more fellow Cryptkeepers:

Visit to Descanso Gardens

Visit to Descanso Gardens

The Procrastonaut is a serious Halloweeniac, sharing her October adventures with us. I was especially envious of her visit to Descanso Gardens, with 5,000 hand-carved pumpkins, including those above. Wow! The Los Angeles area is a great place for ‘Weeniacs.

MyScaryBlog_Wicked2014

My Scary Blog covers all things scary media, with a special emphasis on Halloween this month. Grabbing the link for this post, I discovered Shriek or Chic, Martha Stewart’s Halloween competition web series, which I am going to catch up on tonight. Definitely a blog to follow.

monster+squad

Monster Squad, by Tom Krohne

Monsterfink’s Midnight Monster Spookshow is the home of artist Tom Krohne. For October, he’s drawing slashers (and other things), and sharing his love of Halloween cartoons.

Now more linkies…

Ed Harrington's helpful IKEA-style monster building instructions

Ed Harrington’s helpful IKEA-style monster building instructions

Death in Chocolate from Conjurer's Kitchen

Death in Chocolate from Conjurer’s Kitchen

Both of the above via OTIS, who just happens to be another Cryptkeeper.

10351082_890654884280965_3166316016592722066_n

Rob Kramer is sketching monsters for us every day in October.

–Hat tip Melissa.

20

Sparkling web, photo by Simen Johan

Saw this in many places, posted without credit. The photograph is by Simen Johan. There’s no information as to who built this fantastic beaded web. I want to make one.

bats

Bat prims by Silver Raven Wolf

Thanks, Myra!

Scott-Stoll-Halloween-Style-Challenge-84

Stolloween takes the Home Depot Halloween Style Challenge

Every year, Home Depot sends a bunch of decorations to several Halloweeniacs for their Style Challenge.  It’s no surprise that Scott Stoll takes a blank wall and makes it into something amazing.

Teddy Bear Butcher Shop

Teddy Bear Butcher Shop

Foam pumpkin arch by Don Morin. Maybe I do need more funkins.

Foam pumpkin arch by Don Morin. Maybe I do need more funkins.

–both via Halloween and Cosplay DIY


cpc 10

My forays into holiday food have been so-so this year. I even had one unmitigated disaster that went straight into the trash. If I run out of things to blog, I’ll tell you about it.

I decided that it was my penchant for substituting important things that was doing me wrong. Obviously, I need to experiment more with using sugar substitutes. This time, I pulled out the real stuff. I used three different recipes, which I’ll link, and combined them into deliciousness. Seriously, these things are freakin’ amazing. Also: sugar coma. I made a couple of minor changes, and the baking instructions are different. Here we go.

CHOCOLATE PUMPKIN CUPCAKE

cpc 01

This batter was soooo tasty

Pumpkin Batter (original recipe):

  • 1 cup all-purpose flour
  • 1 teaspoon ground cinnamon
  • 1/2 teaspoon ground garam masala (ginger in the original recipe–use if you like)
  • 1/2 teaspoon allspice
  • 1/2 teaspoon nutmeg
  • 1/2 teaspoon baking powder
  • 1/2 teaspoon baking soda
  • 1/2 teaspoon salt
  • 1 stick butter, softened
  • 1/2 cup sugar
  • 1/2 cup canned pure pumpkin puree
  • 1 1/2 teaspoons pure vanilla extract
  • 2 large eggs
  1. In a medium bowl, whisk together the flour, cinnamon, ginger, allspice, nutmeg, baking powder, baking soda and 1/4 teaspoon salt. Set aside.
  2. In a large bowl, add the butter and the sugar. Beat with a hand-held mixer until light and fluffy, 3 to 4 minutes.
  3. Add the pumpkin puree and the vanilla extract. Slowly beat in the eggs, one at a time. Incorporate the dry mixture into the wet mixtures together until thoroughly combined.

Chocolate Batter (original recipe):

  • Chocolate Cupcakes
  • 1 cup all-purpose flour
  • 1 cup granulated sugar
  • ½ cup cocoa
  • 1 teaspoon baking powder
  • ½ teaspoon baking soda
  • ½ teaspoon salt
  • ½ cup milk
  • ¼ cup vegetable oil
  • 1 egg
  • ½ teaspoon vanilla
  • ½ cup boiling water
  1. Add flour, sugar, cocoa, baking powder, baking soda, salt and espresso powder to a large bowl or the bowl of a stand mixer. Whisk through to combine or, using your paddle attachment, stir through flour mixture until combined well.
  2. Add milk, vegetable oil, eggs, and vanilla to flour mixture and mix together on medium speed until well combined. Reduce speed and carefully add boiling water to the cake batter. Beat on high speed for about 1 minute to add air to the batter.
cpc 02

Yep, completely different consistencies. It works out.

  1. Preheat oven to 325°
  2. Put cupcake liners in muffin tin, spray lightly with nonstick spray. I was skeptical about this, but it really did help.
Festive!

Festive!

  1. Put a glob of pumpkin batter in the middle of the liner. Pour a bit of chocolate over the top, and move on to the next cupcake. When you’re done with the tin, go back and fill all the muffin cups with chocolate to about 3/4 full.
cpc 04

Letting that first bit of chocolate settle around the pumpkin

  1. Bake about 17 minutes, or until an inserted toothpick comes out clean.
Okay, the look good on the outside...

Okay, they look good on the outside…

Yum yum!

Yes! I win!

While those are cooling, you can whip up…

cpc 08

The cupcakes are delicious without frosting. Depends on if you’re a frosting person.

Cinnamon Cream Cheese Frosting (original recipe):

  • 1 (8 ounce) package cream cheese, softened (really, make sure it’s softened, or you won’t get it smooth)
  • 1/4 cup butter, softened
  • 3 cups confectioners’ sugar
  • 1 teaspoon vanilla extract
  • 1 teaspoon ground cinnamon
  1. Beat the cream cheese and butter together until smooth
  2. Add the sugar slowly until incorporated
  3. Add the vanilla and cinnamon, beat until fluffy

After this, I got out the cake decorating stuff.

cpc 07

Yes, those bags came with the kit. Yes, I’ve had it for years. I don’t do this much. I used the wide round tip and piped in a simple spiral. I know my limits. A touch of black and orange sprinkles, and all pretty! I sent most of these to work with the Spousal Unit. His co-workers have encouraged me to bake more Halloween treats.

cpc 09